作者victor0lynn (守护神)
看板WoT
标题[心得] 让你的孩子乐翻天1/5比例可乘坐薛曼战车
时间Wed Jul 10 11:58:57 2013
文章已取得转贴同意
▽▽▽▽▽▽▽▽▽▽▽▽▽▽▽▽▽▽▽▽▽▽▽▽▽▽▽▽▽▽▽▽▽▽▽▽▽▽▽
【翻译】让你的孩子乐翻天的1/5比例可乘坐薛曼战车
翻译原由: 纯粹只是在网路上乱乱看结果就看到这一篇乱有趣一把的文. 的确这是玩具啦
, 但是这个比我们小时候的那种人力车酷多了. 小战车耶.... 还可以开炮, 我觉得这不
吸引人才奇怪.
资料来源:
http://www.gizmology.net/tanks.htm
I bought a toy King Tiger for my 5-year old son (the only reason we men have
kids is so we can play with their toys) and, well, I just "got to thinking."
Could this thing be scaled up and fitted with R/C controls? How big could it
be made? Why not - dare I say it? - big enough for ME TO DRIVE AROUND? Well,
that was a bit excessive, but one big enough for my son to drive around is
well within reason. (Or at least more reasonable than most of the things I
do.) Just imagine the looks on your neighbors faces when you rumble into the
midst of their barbecue in a Panzer, and paste the beer cooler with your 37mm
potato cannon. That'll teach 'em to drink Canadian beer on the 4th of July.
我帮我的五岁大儿子买了台虎王玩具战车(男人想要小孩的唯一理由是这样我们就可以玩
他们的玩具), 噢, 好吧, 我开始这样想 " 这东西能够等比放大到装下无线控制装备吗?
能做成多大的比例? 我说呀, 为什麽不试看看呢? 让它大到可以把我塞进去然後开来开去
? 好好好, 这真的太超过了. 但是要让我儿子坐进去开来开去算是个很好的理由. 至少这
个比我最想做的那件事来得合理多了.想像一下, 当你坐在战车中隆隆作响地开进邻居的
烤肉派对中他们的脸会怎麽样, 然後用你的37mm马铃薯大炮打中啤酒冰桶, 这应该可以教
会他们在七月四日时要喝加拿大啤酒.
http://truth.bahamut.com.tw/s01/201307/4522a534137f5c3d406ab800a00d3086.JPG
Recognize it? It's a WW II era M4 Sherman Tank. It's about 1/5 scale, 28"
wide over the tracks (so it will fit through a standard interior door -
barely), and about 4 feet long. Except for the drive components, it's made
entirely out of wood, even the tracks.
认得出这是什麽吗? 这是二战年代的 M4 薛曼坦克车. 大约是五分之一比例, 从履带开始
算是28寸宽(这样可以通过标准大小的室内门-几乎啦). 大约四尺长. 除了驱动元件外这
完全由木头打造而成, 就算是履带也是木制品.
http://truth.bahamut.com.tw/s01/201307/9b55c79a0deb3e193880dfa0cdc9c6d9.GIF
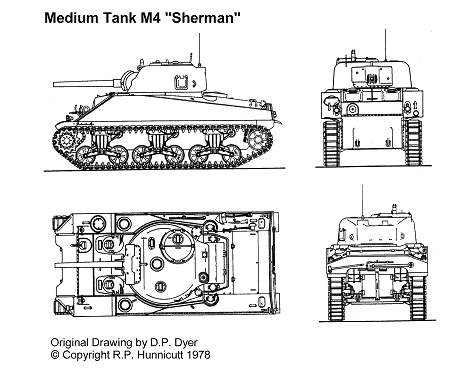
The Sherman was a cool little tank. It was 19'-2" long, 8'-7" wide, 9'-0"
tall, weighed 33 tons, carried a crew of five, and had a top speed on a
smooth road of 24 mph. The 75 mm gun was replaced late in the war by a more
powerful 76 mm gun with a much longer barrel, and some Shermans were equipped
with a 105 mm howitzer. The British equipped theirs with 17-pounder (76mm)
guns, and called them "Fireflies". The first Shermans had a Continental R974
C4, a 9 cylinder radial aircraft engine! This, in part, is why it was so tall
- usually not a desirable characteristic in something people are going to be
shooting at. Later versions had other engines, including the unusual
"Chrysler Multi-bank", five 6-cylinder engines arranged around a common crank.
薛曼是只很酷的小坦克, 19尺2寸长, 8尺7寸宽, 9尺高, 重达33吨, 乘员五名. 在平路上
极速可达24英哩/小时. 原本的75mm主炮在二战中更换成更具威力, 炮管更长的76mm炮,
某些薛曼是装备105mm的榴弹炮. 英军把他们的17磅炮(76mm)装上去然後取名为萤火虫.
第一台薛曼使用Continetal公司的R974 C4型引擎, 这是个9汽缸星形航空引擎! 这就是它
为什麽长得这麽高的原因. 在一个注定会被敌人打的目标中这明显不是个会让人高兴的特
点. 後期版的薛曼装了别种的引擎, 包括了很不寻常的 "克莱斯勒动力盒" , 把五具六汽
缸汽车引装在一起驱动一个曲轴.
Hull 车身
http://truth.bahamut.com.tw/s01/201307/d2143631bd3b9b49fea8e5d4fdbe33c0.JPG
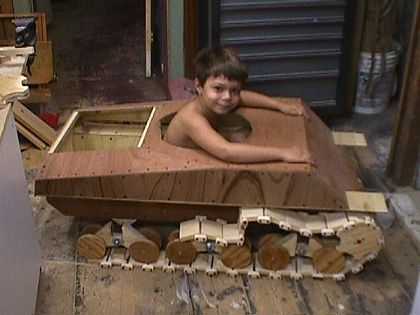
The hull of the model is cut from four quarter-sheets (2' x 4') of ¼" Lauan
plywood. The pieces are attached at the edges with ¾" chines cut from scrap
2x4s. It took about two pounds of 1" and 1-¼" sheet rock screws to hold it
all together. The resulting hull is very rigid and surprisingly light. The
tracks and suspension easily weigh twice what the hull weighs.
模型的车身是由四片1/4寸厚的柳安木夹板(2尺X4尺)切割组成. 这些部件由切剩的木料中
取得的料件组合而成, 锁好後大概用了2磅重的1寸跟1.25寸螺丝钉. 完成的车壳非常粗勇
而且出乎意料的轻. 履带跟悬吊系统的重量很轻易地超过车体的两倍.
Drive Train 变速装置
The power source in this model is two 12v 75Ah deep-cycle Autocraft batteries
driving two 24v 1/5 hp electric gear motors (see the bottom of this page for
more on these motors). The batteries sit in the back, side by side, while the
motors sit in front in the "sponsons" above the tracks, driving the front
axles via a #25 chain and sprockets (I've since switched to #35 chain and
sprockets - see below). There will eventually be a built in 24v battery
charger and fan to ventilate the battery compartment.
Scale speed was designed to be 2 mph, or 3 fps, so the sprocket should have
turned at around 150 rpm. As it turns out, the motors (described in the
catalog alternately as 30 rpm and 45 rpm) actually turn at 67 rpm under no
load. The gears I have available are all 40 teeth, so the final drive ration
is 1:1. Assuming the motors turn ¾ of their free rpm under a normal load,
speed will be 50 rpm, or 1.28 fps. Under 1 mph. That's fine - remember, this
is going to be controlled by a child.
这台模型车的动力源是两个12伏特75安培航空用深循环电池, 用来驱动两个24伏特1/5马
力的电动马达(关於马达的细节请参阅本页最底下的说明). 电池并排地放在後面, 马达则
置於履带上部车身舷侧的最前面.经由25号链条跟链轮齿轮组来驱动前起动轮.(我後来换
成35号链条跟齿轮组, 看底下说明). 最後会内建24伏特电池充电器及加上用来帮电池室
流通空气的风扇.
预定速度是时速两英哩, 或者是说秒速三尺. 所以链齿轮应该调成每分钟150转. 结果呢
, 照目录上规格书说是30转到45转的马达在无负载时的转速可达67转. 我手上有的齿轮都
是40齿的, 所以最後的驱动比是一比一. 假设马达在正常负载下可达到它四分之三的额定
转速, 那转速就会是50转, 或者说是每秒速度为1.28尺. 低於时速一英哩. 这样很好, 要
记得这玩意儿是要给小孩子来控制的.
Control 操控系统
http://truth.bahamut.com.tw/s01/201307/b716db98e6042428d69827c9c17884a8.JPG
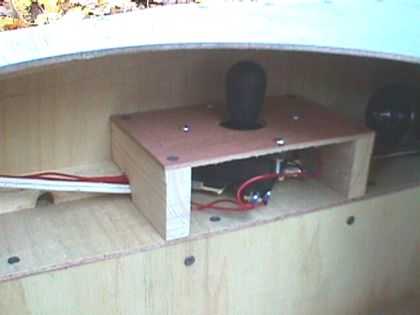
It is be controlled by an X-Arcade joystick, modified to make it shorter,
mounted in the left (my son is a lefty) sponson. It is turned 45° so that
pushing the stick forward triggers what is usually the upper and right (or
left) switches, which control the left and right tracks. Pushing it 45° to
the left will only turn on the right track, and 45° to the right turns on
only the left track. Pushing the stick sideways turns on both tracks, but
running in opposite directions, so the tank will "pirouette" on the spot. The
joystick controls a set of 30A 24v relays to control the motors - I hope to
eventually refit it with PWM control with a "momentum simulator" circuit like
model trains use.
控制方面由 X-Arcade 摇杆来操作, 先切短一些然後装进车体左舷(我儿子是左撇子). 转
45度安装这样当摇杆向前时能够同时启动左右两边的开关(分别控制左边跟右边的履带).
如果以45度左推这样只会启动右边的履带, 把摇杆切往左边或右边则会启动双边的履带,
不过其转动方向刚好相反, 所以这台坦克车可以原地回旋. 这摇杆控制器以一组30安培
24伏特的继电器来控制两个马达. 我希望最终可以达到像是模型火车用的那种脉冲调变
(PWM)的类比控制回路来控制车辆.
Suspension 悬吊系统
http://truth.bahamut.com.tw/s01/201307/cd1fb09a1afbb11eda2b54c171b96b34.JPG
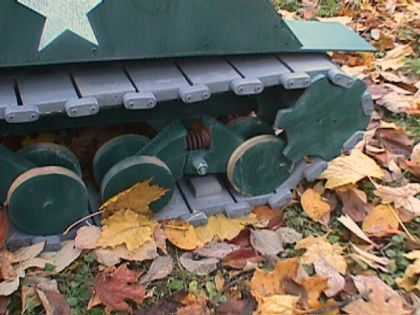
The bogies are modeled after the Horizontal Volute Suspension System (HVSS)
used on the M4A3 version of the Sherman - mostly because it was easier to
model than the original Vertical Volute Suspension System design. The bogie
arms were cut from 2x4, and drilled 1/2" for the axles. There are no
bushings, though I may go back and install some. The wheels are made out of
4-3/8" diameter circles cut from 3/4" plywood, drilled out 7/16" and pressed
onto 1/2" shafts. The springs are valve springs off a Chevy 350. The drive
sprocket was designed in AutoCAD, printed to scale, and glued to a piece of
1/2" plywood. I cut it out on my band saw and used the first one as a
template to cut three more. Two sprockets were then glued and screwed to a
hub of five 2" circles cut from 3/4" plywood, and the whole thing was bored
out 5/8". A 1/4" steel rod passes through the sprocket assembly and the axle.
The axle is mounted on ball bearings.
这个路轮架模仿的是用在 M4A3 的薛曼上的水平对卧悬吊系统(HVSS), 因为这个比原版的
垂直螺旋弹簧悬吊系统简单. 路轮架悬臂是由 2X4 的木板切下, 然後在中心钻孔. 没有
装轴衬, 後来我才想到要装上这些东西. 车轮是由4个从四分之三寸厚的夹板切下的直径
八分之三寸的圆组成. 钻孔後各自安装到路轮架两边的悬臂上. 上面用的弹簧是从雪佛兰
350上拆下的阀门弹簧. 起动轮是先用AutoCAD画好设计图, 等比例印出然後贴在半寸厚的
夹板上. 我先用带锯机切出第一个然後当成型板切出其它三个. 然後把从四分之三寸厚夹
板锯下的五个两寸圆形跟两个起动轮呈夹心状上胶黏好并上好螺钉. 完成後的起动轮钻出
一个八分之五寸的洞, 用根四分之一寸钢棒穿过并安装到车轴上, 车轴则装在滚珠培林轴
承上.
Track 履带
http://truth.bahamut.com.tw/s01/201307/ac8dc7ca7bd488f75c90612207ac653c.JPG
http://truth.bahamut.com.tw/s01/201307/92c96e86e22545c01017df695baf8fbc.JPG
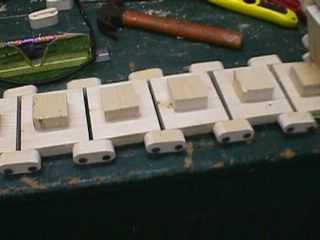
The track is modeled after the T-41 track used on the Shermans late in the
war. (Okay, it's actually modeled after my watch band, but don't tell
anyone.) Each track link consists of a pad, two links, four screws, and a
bell (the thing on the inside of the track that keeps the bogies "on track".)
Building the track is tedious as hell, as each link requires:
履带模仿用在战争後期用在薛曼上的 T-41 型履带 (好吧, 这其实是拿我的表带当样本,
不要跟别人讲). 每个履带节含有一个履带垫片, 两个链接环, 四个螺钉以及一个履带钩(
就是在履带内面让履带可以保持每个转向架上的轮子 "顺轨" 到履带上的东西). 做这些
履带真是个无聊到了极点的差事, 每个履带片包含:
three cuts on the table saw,
在桌锯上切三次
five cuts on the band saw,
在带锯机上切五次
eight holes drilled on the drill press,
在钻床上钻八个洞
four corners rounded on my home-made disk sander,
在我的手工沙轮机上磨出四个圆角
four 2" wallboard screws driven, and
装上四个两寸螺钉
one glued surface.
黏上履带钩的一个面
It takes about ten minutes per link, even though I'm doing them in batches -
all the drill press work at once, for example - to make it go faster! I need
70 links, plus a few extras. And worst of all, I'm not entirely sure a wooden
track will be strong enough - I may end up having to start over again with
something stronger.
每个履带片大概要花十分钟, 就算我用批次大量做的方法 - 比方说一次做好要用到钻床
的部份 - 来加速制做速度. 我需要70片履带片, 可能还要多一些. 最糟的是我甚至不确
定木制履带强度够不够, 有可能我得用更强的材料这样再来一遍.
Turret 炮塔
The turret ring posed some real challenges - after a great deal of fiddling,
I settled on a simple "bushing" style turret ring, although this required me
to bend ¼" plywood to a diameter of 13.5" or so.
炮塔环看起来是个真正的挑战, 在白忙了很久之後我决定用个简单的 "衬套" 式构型的炮
塔环. 即使这样我得去把四分之一寸厚的夹板弯成一个直径13.5寸的东西.
http://truth.bahamut.com.tw/s01/201307/845c8603450ffcd7012dd343129fcb94.JPG
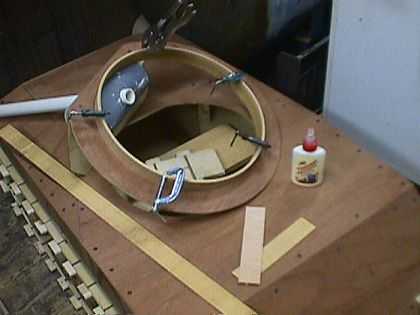
I was lucky in that I found a piece of 1/8" plywood in the corner of the
basement, left by the previous owner of the house. This was perfect, as it
bent easily and - even better - cost me nothing. I cut this piece into four 1-
½" by 36" pieces and used the base of the turret as a form to bend, glue,
and clamp two of them into a ring. They weren't quite long enough to go all
the way around, so I spaced the gaps 180° apart and cut one of the remaining
pieces to fill them in.
幸运的是在地下室我找到个前任屋主遗留下来的八分之一寸厚的夹板. 这太完美了, 这很
容易弯成形状而且不用花我一毛钱. 我把这夹板切成四块1.5寸宽36寸长然後用炮塔底部
弯曲成形, 上胶并把这两部件钳紧成环. 结果长度不够组成一个圆所以我又换成分开做成
180度的部件然後用剩下的材料来补完.
After letting it dry overnight, I sanded it carefully and glued it into place
in the turret base, filling the inevitable gaps here and there with home-made
wood filler (wood glue and sawdust). The turret sits nicely in the hole in
the hull and turns easily, but I still added some wheels swiped from some
Burger King toys (BK toys are full of all kinds of neat little bits) so it
rolls, rather than slides, and sits about ¾" above the hull. A couple of
3/16" bolts though the ring below the hull keep it in place; two of the bolts
are mounted on springs so they can be pulled easily to take the turret off.
让它乾燥一晚之後我小心地打磨好再黏上炮塔底部, 然後用自制的木材填充剂(用锯末加
上木工胶)来填补到处都有的未密合裂缝. 炮塔装上车身上的环而且可以轻松转动, 但是
我还是加上了一些从汉堡王玩具上干来的轮子(汉堡王玩具上到处都有这些小东西), 所以
这炮塔环是用滚动的而不是滑动的, 大概浮在车身上约高四分之三寸的地方. 两根约十六
分之三寸的螺丝穿过炮塔环突出到车身底下以确保炮塔的位置 ; 这两根螺丝装有弹簧所
以可以轻易地压下然後把炮塔取下.
The gun is simply a piece of 1" schedule 40 PVC pipe stuck through a piece of
4" DWV PVC pipe. This gun is a mock up of a pneumatic cannon I've designed
(but not yet finished testing) specifically for this tank. It will be
supplied by pressurized air stored in a 60 cubic inch air tank stowed in the
rear of the left sponson. Tank pressure will be about 100 psi, regulated down
to a much lower pressure for the gun.
炮管本身只不过是把一寸的40 PVC管穿过一根四寸的DWV PVC排水管. 这主炮是特别为这
战车设计, 根据我之前设计过的气压炮(但是未完成测试)仿制而成. 将由一个安装在战车
左舷後侧的容量60立方寸的气压缸提供加压空气, 气缸压约100 psi, 然後会调整到适合
这主炮的低压.
http://truth.bahamut.com.tw/s01/201307/31a09c41be20b91974c954e2cbb73d0d.JPG
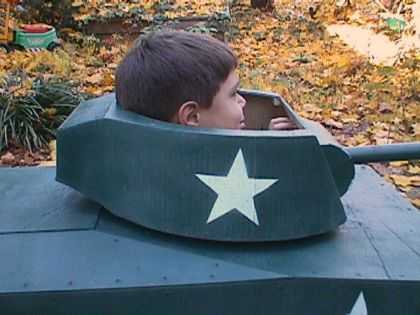
The sides of the turret were cut from corrugated cardboard and glued in place
- I had to take a box cutter and slice up the inside to make it bend
smoothly, but it worked quite well and is surprisingly strong. I almost used
papier-mâché (French for "chewed paper" - how romantic) to replicate the
rounded shape of the original cast Sherman turret.
It took three cans of grey Krylon primer and two of Krylon Hunter Green to
paint the tank. The stars were painted with Krylon White using a stencil cut
from the back of a pad of paper.
炮塔的侧面是由瓦愣纸箱切下来上胶而成的 - 我本来要拿把切割刀削除纸另一面以便容
易成形, 但是看起来不先削掉也弯得很漂亮, 而且颇令人意外的强度不错. 我几乎可以完
美复制原版薛曼的铸造炮塔的圆圆外型. 我用掉三罐Krylon底漆跟两罐Krylon猎者绿色漆
来为这坦克上色. 星型标记则是用个从纸垫上切出来的模板再用Krylon白色漆涂上.
Success! 成功了!
On November 16th, I installed the batteries and gave it a try! Frankly, it
worked great. It was surprisingly powerful and easy to control, even when I
was crawling rapidly along side it with one arm over the side holding the
joystick. (I've since hooked up a remote control.) The tracks made a lot of
noise, but didn't give me any problems. The motors didn't drop too far below
their free-rpm of 66 rpm, and the lights didn't dim so I know the motors
weren't drawing excessive power. I drove it across the basement to the
furnace, pirouetted, and drove it back, a grand total of about 20 feet...
在11月16号我装上电池然後进行试车, 坦白说还不错. 动力强劲而且容易控制, 即使我得
在旁边快步边走边用一只手来操作摇杆. (从那时我就想上个遥控装置了). 履带噪音很大
但没有发生什麽问题. 马达也没有比额定转速 66 rpm 掉速太多, 从灯光没有黯淡所以得
知马达并未用掉太多电力. 我从地下室开到火炉那边然後原地旋转开回来, 走了大约20尺
....
... and failure.
...
然後就不动了.
...and it suddenly stopped moving and starting making an awful grinding noise.
...它突然停止不动并发出可怕的研磨噪音.
http://truth.bahamut.com.tw/s01/201307/1c611274ec4ee7867d9552038575261a.JPG
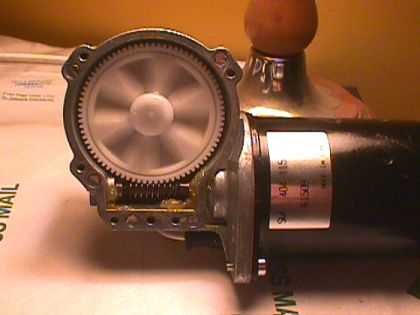
Investigation revealed that the geniuses who designed the motors used a
plastic worm gear in the gearbox. Naturally, the gears stripped. The motors
weren't heavily loaded, as they didn't slow down, draw excessive current, or
even get warm... so why did the gears strip? Shouldn't a transmission be at
least as strong as the motor it is attached to? Is there ever an excuse to
put a wussy little transmission on a big hefty motor? Am I missing something
here?
So now I trying to figure out what to do: cut new steel gears or buy new
motors. I'll keep you posted...
调查结果出来了, 到底是哪个天才会在马达变速箱中设计使用塑胶螺杆? 它就这样坏掉了
. 马达甚至还没达到高负载呢, 所以还没降速, 没有消耗大电流, 甚至没温升... 为什麽
这零件会坏掉? 传动轴难道不应该要强度足够负担马达所施给它的力吗? 还有没有什麽藉
口可为这软弱的小传动轴无法负担强力的马达开脱? 我是不是弄错了什麽?
所以我现在得弄清楚该怎麽做: 换上新的钢制零件还是去买个新马达, 我会持续更新...
⊕
Update 11/26/2002 - I think I've identified the manufacturer of these motors:
AM Equipment. These motors appear to be their model 224-1103. If it weren't
for the plastic gears, I'd say these were very nice, inexpensive, powerful
motors.
11/26/2001 更新 - 我想我找到这些马达的制造商了: AM Equipment. 看来这些马达属於
该公司的224-1103 型. 假如没有使用那塑胶零件我会说是个不错的强力马达, 也不贵.
⊕
Update 12/21/2002 - After wasting two weeks trying to get replacement metal
gears cut for less than $300 each, I gave up and ordered some MONSTEROUS
motors from botparts.com. Brock Schippers, who runs the show over there, was
very helpful in recommending AM Equipment 265-1002 motors: 48 ft-lbs of
torque at stall, and 82 free rpm! That's a scary amount of torque.
12/21/2002 更新 - 在浪费两周尝试以低於每个要价300美元的代价取得替换的金属零件
後, 我放弃并转向 botparts.com 订购一些怪物级的马达. 该网站站长 Brock
Schippers 推荐使用AM Equipment 265-1002 号马达: 48 尺-磅的扭力以及 82 rpm的额
定转速 ! 真是吓死人的高扭力.
They arrived on the 19th, and the first thing I did was pop the cover and see
what kind of gears were inside. I suspected they'd be metal, as the covers
were held on with screws, and not rivets as they had been with the original
motors (as if the engineers were too ashamed to let anyone look inside...). I
was right, the gears are metal! Woohooo!! I have begun installing them -
which will take some rebuilding, as they're frickin' HUGE - and will post
pictures soon!
在19号时马达送到, 我首先做的事是打开盖子看看它是使用什麽样的零件. 我预期是金属
制品, 因为盖子是用螺丝固定的. 而且跟我原来那马达是用铆钉固定不同(是不是工程师
怕人家看到里面...). 我猜对了, 零件是金属的! 太棒了! 所以我开始安装- 看来得要重
建一下, 因为这新马达他妈的大只- 我很快会把照片po上来!
⊕
Update 12/24/2002 - IT IS ALIVE! (Maniacal laughter.)
The new motors are installed, though it took a major rebuilding effort. They
are MUCH more powerful than the old motors, and can pirouette the tank with
ease. They're quiet, too.
12/24/2002 更新- 复活了! (狂笑中)
新马达安装完成, 虽然需要重新建构一下, 这新马达比旧有的更为强力, 能够轻易地原地
回旋. 也很安静.
New motors in place.新马达安装完成.
http://truth.bahamut.com.tw/s01/201307/795437524a721d906fe089036006b5ff.JPG
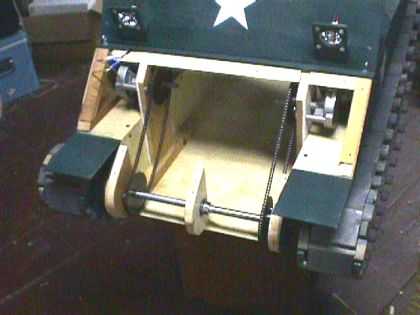
I spent the time waiting for the motors to arrive building headlights - two
50 watt MR-16 halogen bulbs. They're not very realistic looking, but they're
incredibly bright. Finally being able to test the tank, I've found a small
problem - the road wheels keep falling off the axles. I had thought that a
friction fit would be sufficient to keep them in place, but alas, I was
wrong. I am working on a fix using e-style retaining rings.
Merry Christmas/Hanukah/Solstice, etc!
在等待新马达送到的时间我做了车头灯 - 两个50瓦的 MR-16 卤素灯. 看起来不太逼真不
过真的很亮. 终於能够测试坦克了, 我发现了个小小的问题 - 路轮不断地从轮轴上掉下
来, 我以为摩擦力足够固定它们, 但是.. 我错了. 现在我试着用e型环固定它们.
喔, 对了, 圣诞快乐!
⊕
Update 2/11/2003 - Further testing
I fixed the road wheel problem using e-clips. I chucked each axle in the
drill press and used a hack saw to cut a small grove in each end for the
clips - works great!
Further testing revealed yet another problem, however - the chains refused to
stay on the sprockets for very long. Turns out I was over-optimistic when I
hoped that I wouldn't need a way to tension the chains. The fix was pretty
easy, though - I just modified the motor mounts to allow the motors to shift
slightly backwards to tighten the chain.
I've also started work on the gun. The trick will be to fit all the necessary
components into the available space between my son's nose and the front of
the turret! The current incarnation uses a 3/4" copper pipe as a barrel, and
a specially modified ball valve for a breech.
2/11/2003 - 更多测试
我用e形固定片修好了路轮的问题, 在每个轮轴都用钻子加压然後锯掉加装固定片多余的
部份之後 - 有效!
然而接下来的测试冒出另一个问题 - 链条无法固定在齿轮上很久. 我当初太乐观了了才
会以为不需要保持链条张力的法子. 不过修正的方法很简单 - 我只需要修改一下马达的
安装位置, 稍为向後些来张紧链条.
我也开始加工火炮. 必需在炮塔前面到我儿子鼻子前的这空间装进所要的零件! 目前的方
案是使用一根四分之三寸铜管当炮管, 然候在後膛加装个球型阀门.
⊕
Update 3/10/2003 - Plans and Instructions!
3/10/2003 - 设计图与建造步骤
Several people have urged me to write up a set of plans and instructions and
offer them for sale. So - I am writing "Building a 1/5 Scale M-4 Sherman Tank
Riding Toy", 56 pages and 81 illustrations and photos. It will be in PDF
format, and I think I will charge $10 for it delivered over the web, or $15
on CD by snail mail. I am hoping to get it all up and running in a week. I
still working on the pneumatic gun - free time has been in short supply
lately. I've got it mounted in the turret, but no air supply hooked up yet.
Boy, I can't wait for warm weather so I can take the tank outside and get
some decent pictures. I've been very lucky in that my son hasn't grown an
inch since I started this project!
有些人敦促我写下设计图跟建造步骤, 他们想买. 所以我正在写 " 建造五分之一比例的
可乘坐薛曼坦克玩具车 ", 有56页跟81个图解跟照片. 是PDF格式稿件, 我在网路上只收
10美元或者用蜗速的邮局寄送CD. 我希望能在一个星期内完成这工作. 目前我还在加工气
压炮 - 最近一直没什麽空闲时间可以做. 已经将炮管安上炮塔了, 但还没加挂气压设备
. 我真等不及温暖的季节到来这样我就可以把坦克开出去并照些照片. 真是幸运, 打从我
开始做这战车到现在我儿子没有长高一寸.
⊕
Update 3/21/2003 - Beware the Ides of March
3/21/2003 - 三月份的风起云涌
On March 15, this site received one million hits. (One million hits isn't
quite as impressive as it sounds - a mere 84,000 visitors.) Turns out that
this site was featured on Fark.com, and from there news of it spread to some
other sites.
在三月15日本站收到一百万的点击率. (百万点击率其实没有表面上听起来那麽让人感动
, 因为只有84000位访客). 本站在 Fark.com 上得到专访并散播到其它的网站上.
Fark - lots of visitor commentary
一大堆访客留言
Slashdot - lots of visitor commentary (some of it WAY stupid)
一大堆留言(有些真的很蠢)
b3ta (which gave me "The prestigious B3ta Best Dad In The World Award", heh
heh)
(该站颁给我颇负声望的B3ta世界上最棒老爸奖, 哼哼)
Userfriendly
Blue's News
Plus a bunch in Japanese that I won't list here because I can't read Japanese
and don't know what they say.
还有一大堆我没列上来的日文信因为我不懂日文所以不知道他们在讲什麽.
It even spread to Radio - I am to be interviewed for "The Other News", a
one-minute blurb put out by the Associated Press Radio Network! I'm really
quite amazed at all this attention.
甚至传到广播网上了 - " The Other News "跑来访问我, 在美联社广播网上放送一分钟
的内容! 受到这麽多关注後我还真的有点吃惊.
⊕
Update 4/5/2003 - Plans are now available
4/5/2003 更新: 蓝图已备妥
Well, I finally reached a point where I think the plans are fit for human
consumption. I haven't started offering CDs yet, but the plans are available
for downloadhere. Too bad I didn't have it ready before I got slashdotted.
Also, I've made a lot of interesting progress on the pneumantic canon. I've
managed to fire a 2.6 gram foam-and-penny projectile sixty feet straight up.
I'm working on a web page for just the gun, and hope to have it in place
later this weekend.
好的, 我终於完成足以满足人们要求的蓝图. 我还没开始提供CD版, 但是蓝图可以在这边
下载. 最糟的是在我的网站因被介绍而暴红後我还没准备好. 此外在气压炮方面我得到了
一些有趣的进展. 我计画用它发射一个重2.6公克的由一便士硬币组成的炮弹, 射程60尺
. 我正在制做关於这个火炮的网页, 希望在本周末能做好网页.
⊕
Update 4/23/2003 - Sprocket troubles
4/23/2003 更新: 齿轮出问题了
It was such a nice, warm, sunny day that my son and I tried to take the tank
on an outing to photograph it. Alas, it promptly threw a drive chain, which
got jammed between the sprocket and the side of the hull so hard that I had
to take it all apart to get it out again.
I also discovered cracks in the 3/4" plate at the back which tension the
track, so I replaced it with a thicker piece.
We'll try again soon.
在一个天气这麽好, 充满阳光又温暖的日子我跟我儿子试着把坦克带出去拍拍照. 结果,
它把起动轮的链条给喷了出来, 在齿轮跟车身间卡得死死, 害我得把东西拆开才拿得出来
. 我也发觉後部维持履带张力的那四分之三寸板子有裂痕, 所以我用更厚的板材代替. 我
们会尽快再试一次.
⊕
Update 5/3/2003 - KAPOW!
5/3/2003 更新: 卡碰 !
I finished the gun and have it installed in the tank! See the gun page for
more info on the gun.
I also jacked up the tank 3/4" by adding shims between the axles and the
hull. Why? Because I was fiddling around with some photos I took of the tank
and figured I'd overlay a line drawing of The Real Thing - the line drawing
was taller! Can't have that, can we? It's amazing the difference 3/4" (less
than 4 scale inches) makes in the way it looks.
I also made a non-very-accurate 1/6thish scale model of an M3 37mm anti-tank
gun to tow behind the tank. Don't ask me why, I don't know.
火炮完工并装上坦克了! 可参阅火炮网页取得更详细的细节. 我也在车身跟车轴间用垫片
提高车身四分之三寸. 为什麽这样做? 因为无聊审视我之前拍的这坦克照片时我把真战车
的线稿拿来重叠比对, 线稿的真战车比较高! 可以这样吗? 不行吧? 这令人讶异的差距是
四分之三寸 ( 不到4比例寸) 造成它看起来变这样. 我还做了一个不是很精准的六分之一
比例的 M3 37 mm 反战车炮的模形放在坦克车後面拖着, 不要问我为什麽, 我不知道.
⊕
Update 5/4/2003 - More sprocket troubles.
5/4/2003 更新: 更多的链齿轮问题
I give up on this damn #25 chain. It just WILL NOT stay on the sprockets!
I've aquired some #35 chain and sprockets to match, and have started
installing them. I had some 35B15 sprockets with a 5/8" bore, which I used on
the drive axles, but I had to order sprockets for the motors. They have 12mm
shafts - ever try to get a #35 sprocket with a metric bore? (I need something
called "ISO 06C-1" sprockets - ISO 06C being the metric version of ANSI #35
chain. Just try and find any!) I ordered sprockets with a 1/2" bore, and I'll
install sleeves to make them fit.
我放弃使用这该死的25号链条了, 它就是无法卡在链齿轮上! 我已经拿到一些35号链条跟
链齿轮组来试合, 并开始安装上去. 我有一些35B15 链齿轮, 轴孔是八分之五寸, 这样我
可以拿来用在启动轮轴上. 不过我得为这些马达订购链齿轮(马达轴杆尺寸是12mm), 需要
去找到有公制尺寸的轴孔的35号齿轮? 我需要那个叫作 " ISO 06C-1 "的齿轮 - 公制版
本ISO 06C 的链齿轮然後可以装得上 ANSI 35号的链条. 这东西找得到吗? 我订购了些半
寸轮轴的链齿轮然後装上套管以符合尺寸.
⊕
Update 5/15/2003 - SUCCESS!!
5/15/2003 更新: 成功了!
Last weekend I installed the #35 chain and sprockets, and while I was at it I
added a better, stronger chain tensioning mechanism.
To test the new setup, my son and I drove it around the block! It took a good
fifteen minutes of squeaking and rumbling, and by the time we got back we had
an entourage of about fifteen kids following us. Everything worked!
上周末我装好那35号链条跟链齿轮, 此时我加上了个更棒更强的链条张力维持器. 为了测
试新装备我跟我儿子沿着街廓开了一圈! 发出嘎吱嘎吱轰隆隆的声音开了约15分钟, 同时
夹带了约15个过来围观的小朋友跟着我们. 所有机件运作无误!
⊕
The track held up very well - it even withstood the full tension of the
motors at stall (when they produce their peak torque) when I climbed it over
some rough ground. The surface is all scuffed up now, but there are no cracks
or splits. One of the screws wanted to unscrew itself, but that was the only
problem.
履带撑得住 - 它甚至承受得住在爬上一些不整地时引擎怠速时的全部张力( 当发出峰值
扭力时). 履带表面现在全都摩损了但是没有裂开或者破损. 某根螺丝钉有松脱倾向, 但
是只有这个问题.
The rest of the suspension held up well, too. It was quite a blast watching
the road wheels follow the terrain over rough ground.
悬吊系统也工作得很好, 在越过不整地时路轮跟着地形高低起伏.
One effect I noticed - when my son isn't in the tank and it's being operated
remotely (by a long wire plugged into the back), the center of gravity is WAY
aft, causing it to do some pretty spectacular tailstands over relatively
small obstructions. I may add a second battery tray in the middle to move the
CG forward when the driver is out.
我注意到一个现象, 当我儿子没坐在坦克中控制, 以接在车後的长电线进行遥控时重心落
在车子的後部. 这样会造成在越过些小障碍物时来个华丽的向後翻车. 也许我该在车子
中间加上第二个电池格位以免驾驶员不在时可移动重心.
Now I just need to take some video and get it converted to mpeg or avi format
for the website!
The chains did skip a few times during the trip, mostly when climbing over
obstructions (once I began to think it was going to make it all the way
around the block, I started hitting every obstruction I could find). As a
result I RE-re-designed the chain tensioner. This one is REALLY robust.
现在我只需要拍些影片然後转成mpeg或者avi格式然後放在网站上! 行进间链条有几次脱
离, 大部份发生在越过障碍物(我开始在想在绕着街廓走的时候我是不是开始压过看得到
的所有障碍物). 後来我重新设计了链条张力器, 这个东西真的很可靠.
http://truth.bahamut.com.tw/s01/201307/9753e513ba8e7677498994b2f217f4db.JPG
By the way, anyone who bought the Plans and Instructions will be receiving an
updated version incorporating all these changes.
顺道一提, 任何买过蓝图的人都会收到更新版的以因应所有的改进.
⊕
Update 5/24/2003 - An Idea
I had an idea to improve the support of the half-shafts. (Refer to the 12/24
update above for a pic of the original design.) The function of the center
support was just to hold the two half-shafts in a straight line, but the
plywood would bend slighly under load and misalign everything. This, in fact,
was probably a large part of the problem with the #25 chains. My solution was
to eliminate the center bearing entirely!
5/24/2003 更新: 一个想法
我想到个方法来改善那两个前起动轮轴(参考上面12/24更新版的原始设计图). 原本的中
间那板子只不过是为了把这两个轮轴轴心对在同一条线上, 但是夹板在负载之下会有点弯
曲, 事实上这个可能就是那个25号链条出问题的原因. 我的解决方案是把中心轴承完全取
消掉.
http://truth.bahamut.com.tw/s01/201307/c8c06d4c468e1aabf350001ba2d05b45.JPG
Improved drive axle arrangement. 改良版的起动轮轴设置
I replaced it with a piece of pipe with bearings in it. This arrangement
requires two more bearings than the old arrangement, and a piece of pipe with
the proper inner diameter, but it places all the forces on the outer axle
bearings so everything remains in line.
我用了一根两端有轴承的管子来代替原本的板子, 这样设置比原本的设计多两个轴承, 以
及一个有合适内径的管子, 但是这样可以把所有力分配到外部轮轴所以全部可以维持在一
条线上.
Experiments with a 12v wireless B/W video camera are under way - I borrowed a
security camera and monitor from my folks, who run the Coxsackie Antique
Center. In the long run, I want the tank to be radio controlled, and a camera
will allow the driver to better see where he's going. In the mean time, it
will just be neat.
已着手实验装上12伏特的无线影像黑白摄像头, 我跟朋友 (他经营 Coxackie 古董店) 借
了个保全用的摄影机跟监视器, 长远来说我希望至坦克可以无线遥控, 摄影机可以让驾驶
者较清楚地知道他往哪儿去. 而且这样就是很酷.
http://truth.bahamut.com.tw/s01/201307/94ef2de7660b2044800cb9ea79f66ba0.JPG
Those LEDs are invisible, but my camera can see them. Cool!
这些LED光人眼看不到, 但是我的摄影机可以看得到, 太酷了!
As it turns out, it's an infra-red camera, so the tank will have "thermal
imaging" just like the big boys!
原来这个是个红外线摄影机, 所以这坦克现在跟真战车一样有了 "热影像视力" ,
http://truth.bahamut.com.tw/s01/201307/e72413a7cba9eb38c0025504d1485e43.JPG
One seriously happy kid!
乐翻天的孩子!
翻译者文章:
http://forum.gamer.com.tw/C.php?bsn=60433&snA=24061
翻译者:star mark
--
※ 发信站: 批踢踢实业坊(ptt.cc)
◆ From: 117.56.242.127
1F:推 korsg :神人级DIY 07/10 12:19
2F:推 wild2012 :好强阿! 07/10 12:21
3F:推 zmcef :孩子会开到一半要下来修履带吗 07/10 12:25
4F:推 abc12812 :有夜视功能? 比游戏里的坦克强了阿 07/10 12:26
5F:推 GALGUN :这爸爸真棒 07/10 12:35
6F:推 myanigi :超棒的啊! 07/10 12:43
7F:→ victor0lynn :靠么!修履带!笑死我了.小孩太晚回来应该是在修履带 07/10 12:45
8F:推 forever9801 :这台应该不敢开出庭院外吧 不然不小心被车撞了不就 07/10 12:51
9F:推 GALGUN :要赔对方修车钱 07/10 12:51
10F:→ victor0lynn :孩子可能会回头给他一炮 07/10 13:01
11F:推 shan512105 :这老爸超赞的XD 07/10 13:02
12F:→ victor0lynn :吃我的马铃薯榴弹 07/10 13:02
13F:推 hitlerx :2002年,现在小孩长大了,该改做Maus了 07/10 13:24
14F:推 acebruce :结果应该有188吨重的maus被一台不到两吨的车撞爆 07/10 14:03
15F:→ acebruce :驾驶得到「神风」徽章! 07/10 14:03
16F:推 b97505048 :老天这也太厉害了~ 在台湾能玩到遥控的就不错了吧~ 07/10 17:04
17F:推 damnedfish :原来木头也能做履带 07/10 17:24
18F:推 lsslss :木头能做履带阿 只是不耐用而已 07/10 17:34
19F:→ qoopichu :台湾人没有那种时间,也没有足够的空间 07/10 18:41
20F:推 Xxtreme :老爸爱玩爽到小鬼 07/10 19:34
21F:推 melzard :这只的隐蔽系数应该很高 07/10 20:01